Chapter 18
Adding sync pulses to the video signal
This section contains details for providing a composite video output signal from
the camera to drive an external monitor. The circuit described below, designed
by Peter Smith, is a combined DC-restorer, switchable gamma corrector and
video/sync mixer using a photodiode and LED to sense the 32 holes around the
disc's circum-ference to generate the required sync pulses. The negative
excursion of the video signal from the camera head is clamped to 0.8 of a volt
by the action of the amplifier IC1 and the diode D1. The black level clamp is
set by the ratio of R2 to R1. This determines the amplitude of the resulting
sync pulses. The amplitude of the video component of the signal is set by RV1.
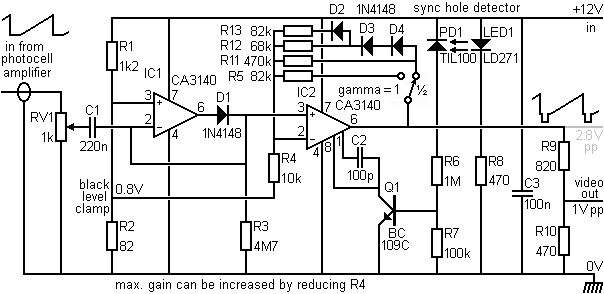
IC2 is configured as a non linear DC-amplifier. Diodes D2 to 4 and resistors R11
to 13 approximate a square root response (gamma = ½). RV1 should be
adjusted for 1V pp video out to ensure proper operation of the gamma correction
circuit. With the switch to R5 the response is linear (gamma = 1).
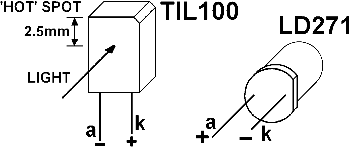
The strobe pin 8 of the second CA3140 is connected to the output of the photo
diode via Q1. The sync hole detector components PD1 and LED1 must be carefully
aligned with the sync holes in the disc. In some cases the duration of the sync
pulses obtained by this arrangement may be rather long, leading to a broad sync
bar at the bottom of the picture that wastes valuable picture area. Masking the
surrounding area of the TIL100 detector 'hot spot', so that the light sensitive
area is defined by a small (2mm) hole, can cure this problem.
One of the 32 sync holes in the disc needs to be masked to produce a standard
missing frame sync pulse, the hole that passes the opto fork when the spiral of
scanning holes jumps to a new frame. Final adjustment of the opto fork can be
done by observing the position of the sync bar on the picture in the monitor.